Difference between revisions of "WT81B003-0202 (Ultrasonic long distance sensor)"
(Documented the sensor tests made) |
|||
| Line 9: | Line 9: | ||
To quickly see what the sensor transmits on the UART ports, we can use a raspberry pi and a python script. See [https://electrosome.com/uart-raspberry-pi-python/ Using UART on Raspberry PI] | To quickly see what the sensor transmits on the UART ports, we can use a raspberry pi and a python script. See [https://electrosome.com/uart-raspberry-pi-python/ Using UART on Raspberry PI] | ||
| − | The wiring is simply the TX UART pin connected with the RX pin of the sensor and the TX of the sensor connected through a voltage divider (5K1, 10K) to the RX UART pin of the raspberry. | + | The wiring is simply the TX UART pin connected with the RX pin of the sensor and the TX of the sensor connected through a voltage divider (5K1, 10K) to the RX UART pin of the raspberry. The raspberry was connected via Ethernet + SSH to the PC and printed the results on the terminal, so no keyboard + monitor needed. |
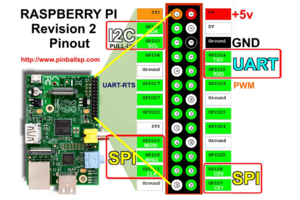
[[File:Raspberry-pi-2-gpio-pinout.png|thumb|GPIO Pinout]] | [[File:Raspberry-pi-2-gpio-pinout.png|thumb|GPIO Pinout]] | ||
Revision as of 22:45, 3 August 2017
The Waytronic WT81B003-0202 18m (see [1]) should be able to provide distance measurements at least every 250ms up to 18m with a tolerance of +-10cm.
It can be set in various operation modes, one of those communicates through a standard serial protocol (9600/8-N-1). Using an Arduino board equipped with an uart port it's possible to test the sonar performance. The sketch can be found at https://mega.nz/#F!Bo8jHabQ!kwxQR5jFZorFaOLdQKsTdw)
Contents
UART prototyping on Raspberry PI
To quickly see what the sensor transmits on the UART ports, we can use a raspberry pi and a python script. See Using UART on Raspberry PI
The wiring is simply the TX UART pin connected with the RX pin of the sensor and the TX of the sensor connected through a voltage divider (5K1, 10K) to the RX UART pin of the raspberry. The raspberry was connected via Ethernet + SSH to the PC and printed the results on the terminal, so no keyboard + monitor needed.
The following python script then does all the work easily. A test output can be 1.26m 25.1°.
Note: Big ENDIAN is used (see datasheet). The byte sequence is as follows:
- header (1 byte)
- unsigned short distance (2 bytes)
- signed short temperature (2 bytes)
- checksum (2 bytes)
#!/usr/bin/env python
# -*- coding: utf-8 -*-

import serial
import binascii
from struct import *

ser = serial.Serial("/dev/ttyAMA0")
ser.baudrate = 9600

ser.write("\0")
output = ser.read(6)
header, distance, temp, checksum = unpack(">cHhc", output)

#print(binascii.hexlify(output))

print("%.2fm, %.1f°" % (distance/1000.0, temp/10.0))
ser.close()
Test Results
On August 3rd the tests were all successful, everything went smoothly, no problems encountered, using the 12V Vcc from the voltage distribution board.
It works fine from 50cm on. No long distance test made (maximum 1.50m). Looping on the command line with sleep 0.3 works fine.
Requirements for the Arduino Slave
- Checksum checking
- Stable state machine implementation with timeouts and failure mode
- Full sensor frequency usage (~ 10Hz)
Datasheet
The original datasheet is in Chinese, the following version was translated with Google Translate:
